Key Features
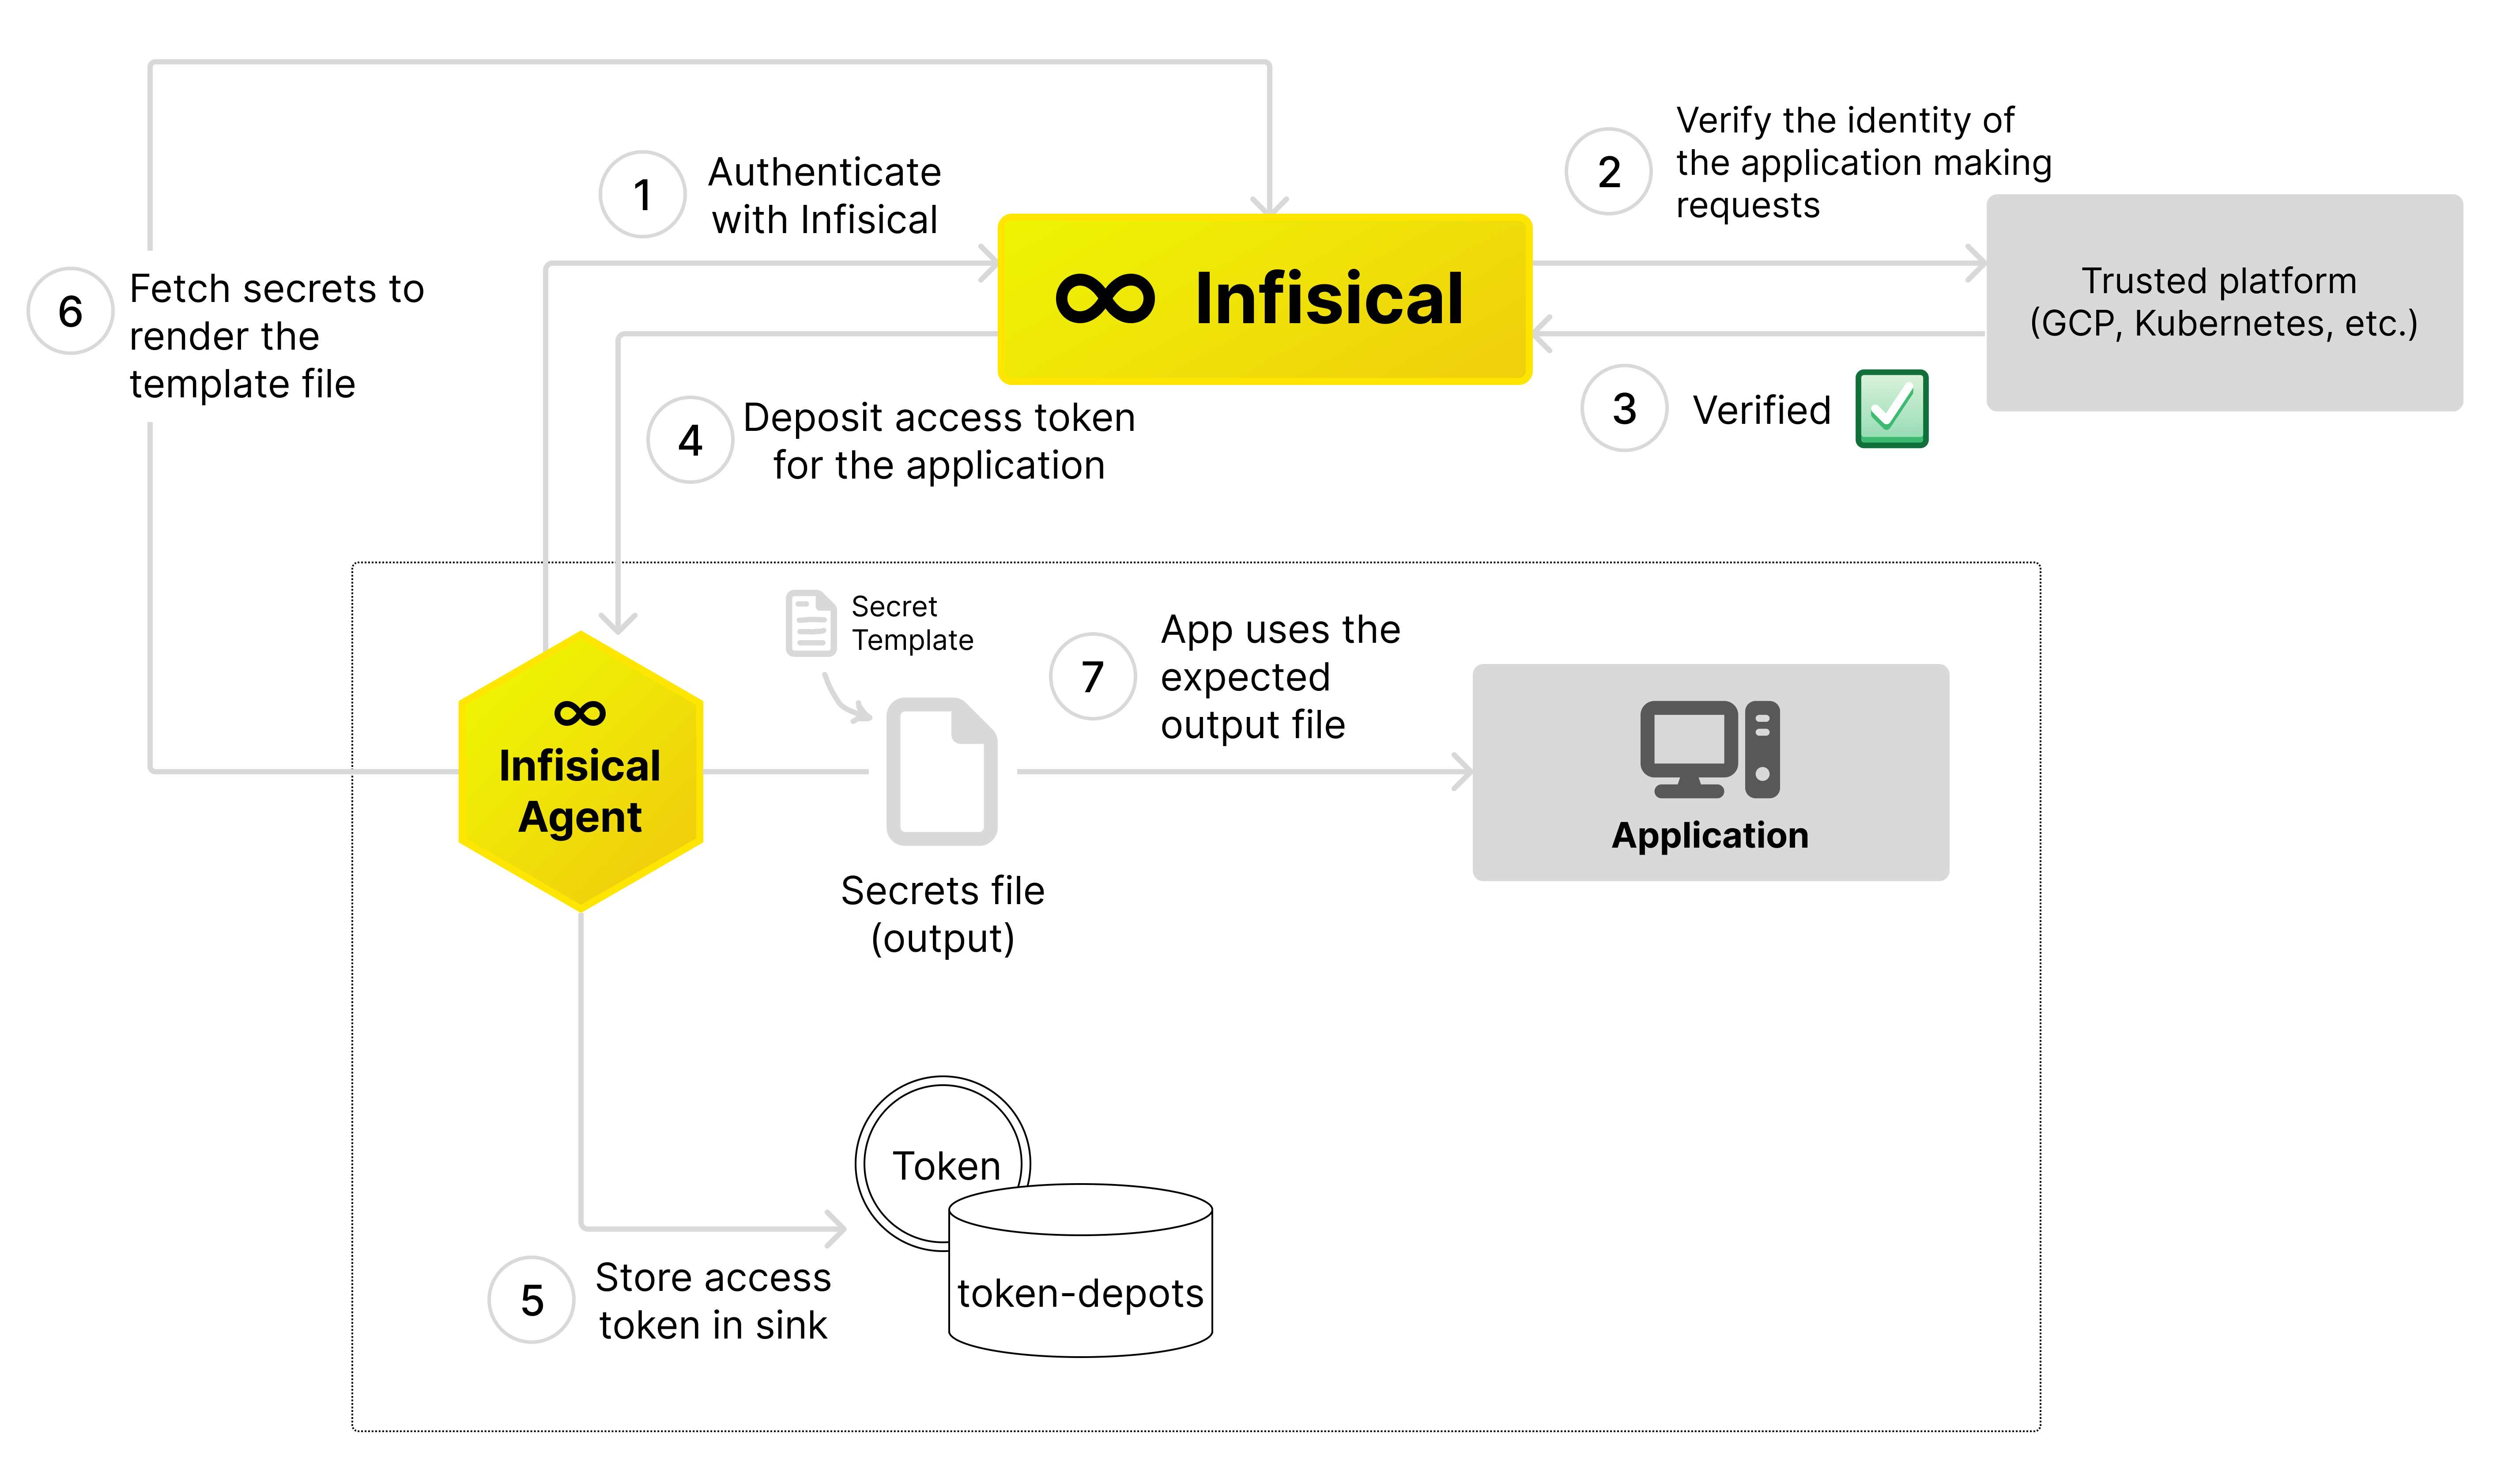
- Token lifecycle management: Automatically authenticates with Infisical and deposits renewed access tokens at specified path for applications to consume
- Templating: Renders secrets and dynamic secret leases via user provided templates to desired formats for applications to consume
Token Renewal
The Infisical agent can help manage the life cycle of access tokens. The token renewal process is split into two main components: aMethod, which is the authentication process suitable for your current setup, and Sinks, which are the places where the agent deposits the new access token whenever it receives updates.
When the Infisical Agent is started, it will attempt to obtain a valid access token using the authentication method you have configured. If the agent is unable to fetch a valid token, the agent will keep trying, increasing the time between each attempt.
Once a access token is successfully fetched, the agent will make sure the access token stays valid, continuing to renew it before it expires.
Every time the agent successfully retrieves a new access token, it writes the new token to the Sinks you’ve configured.
Access tokens can be utilized with Infisical SDKs or directly in API requests
to retrieve secrets from Infisical
Templating
The Infisical agent can help deliver formatted secrets to your application in a variety of environments. To achieve this, the agent will retrieve secrets from Infisical, format them using a specified template, and then save these formatted secrets to a designated file path. Templating process is done through the use of Go language’s text/template feature.You can refer to the available secret template functions here. Multiple template definitions can be set in the agent configuration file to generate a variety of formatted secret files. When the agent is started and templates are defined in the agent configuration file, the agent will attempt to acquire a valid access token using the set authentication method outlined in the agent’s configuration. If this initial attempt is unsuccessful, the agent will momentarily pauses before continuing to make more attempts. Once the agent successfully obtains a valid access token, the agent proceeds to fetch the secrets from Infisical using it. It then formats these secrets using the user provided templates and writes the formatted data to configured file paths.Available secret template functions
The secret template functions is what you will use to fetch resources such as static secrets and dynamic secret leases from Infisical. Below is a list of the available secret template functions that you can use in your templates.listSecrets
listSecrets
example-template-usage-1
example-template-usage-2
listSecretsDescription: This function can be used to render the full list of secrets within a given project, environment and secret path.An optional JSON argument is also available. It includes the properties recursive, which defaults to false, and expandSecretReferences, which defaults to true and expands the returned secrets.Returns: A single secret object with the following keys Key, WorkspaceId, Value, SecretPath, Type, ID, and CommentlistSecretsByProjectSlug
listSecretsByProjectSlug
example-template-usage-1
example-template-usage-2
listSecretsByProjectSlugDescription: This function can be used to render the full list of secrets within a given project slug, environment and secret path.An optional JSON argument is also available. It includes the properties recursive, which defaults to false, and expandSecretReferences, which defaults to true and expands the returned secrets.Returns: A list of secret objects, each with the following keys Key, WorkspaceId, Value, SecretPath, Type, ID, and CommentgetSecretByName
getSecretByName
example-template-usage
getSecretByNameDescription: This function can be used to render a single secret by it’s name.Returns: A list of secret objects with the following keys Key, WorkspaceId, Value, Type, ID, and CommentdynamicSecret
dynamicSecret
example-redis-dynamic-secret
example-ssh-dynamic-secret
dynamicSecretDescription: This function can be used to render a dynamic secret lease credentials. The credentials are automatically renewed before they expire, ensuring that the rendered credentials are always up-to-date.Returns: An object with keys corresponding to the dynamic secret lease credentials.The principals argument is only applicable to SSH dynamic secrets, where it is required. It accepts a comma-separated list of principals for the SSH certificate. The requested principals must be in the allowed list configured on the dynamic secret.Caching
The Infisical Agent supports clientside caching of Dynamic Secret leases. If the cache is enabled, the agent will persist the dynamic secret leases to the cache across restarts of the agent.Persistent Caching
The Agent currently only supports persistent caching. To utilize persistent caching, you must be within a Kubernetes environment. We recommend using the Infisical Agent Injector to inject the agent into pods within your Kubernetes cluster on demand.Cache eviction
Cache eviction is the process of removing cached data from the cache. The Agent will automatically evict cached data when the cache is full during a garbage collection cycle which is triggered every 10 minutes. The cache will also automatically evict cached data that has gone stale or is about to go stale. For dynamic resources (such as dynamic secret leases), there’s a TTL (Time-to-Live) associated with each lease which is used to determine if the lease is stale or about to go stale. If a stale dynamic secret lease is detected, it will be automatically evicted from the cache and replaced with a new up-to-date lease.Cache Configuration
Configuring the cache is done through the agent configuration file. The following fields are available to configure the cache:Persistent Caching
Persistent Caching
The type of persistent caching to use. Currently only
kubernetes is available, and will only work within Kubernetes environments.The path to where your persistent cache will be stored.
Persistent caching is only supported within kubernetes environments at the moment. Please refer to the Infisical Agent Injector documentation for more information on how to use persistent caching within Kubernetes environments.
example-agent-config-file.yaml
Retrying mechanism
The agent will automatically attempt to retry failed API requests such as authentication, secrets retrieval, dynamic secret lease provisioning, etc. By default, the agent will retry up to 3 times with a base delay of 200ms and a maximum delay of 5s. You can configure the retrying mechanism through the agent configuration file. The following fields are available to configure the retrying mechanism:How many times to retry failed API requests such as authentication, secret retrieval, etc. Defaults to
3 retries.The maximum delay between retries. Defaults to
5s (5 seconds).The base delay between retries. Defaults to
200ms (200 milliseconds).example-agent-config-file.yaml
Agent configuration file
To set up the authentication method for token renewal and to define secret templates, the Infisical agent requires a YAML configuration file containing properties defined below. While specifying an authentication method is mandatory to start the agent, configuring sinks and secret templates are optional.| Field | Description |
|---|---|
infisical.address | The URL of the Infisical service. Default: "https://app.infisical.com". |
infisical.exit-after-auth | Whether to exit the agent after authentication and first secret render. Default: "false". |
infisical.revoke-credentials-on-shutdown | Whether to revoke all managed dynamic secret leases and identity access tokens on shutdown. Default: "false". |
infisical.retry-strategy.max-retries | How many times to retry failed API requests such as authentication, secret retrieval, etc. Defaults to 3 retries. |
infisical.retry-strategy.max-delay | The maximum delay between retries. Defaults to 5s (5 seconds). |
infisical.retry-strategy.base-delay | The base delay between retries. Defaults to 200ms (200 milliseconds). |
auth.type | The type of authentication method used. Available options: universal-auth, kubernetes, azure, gcp-id-token, gcp-iam, aws-iam |
auth.config.identity-id | The file path where the machine identity id is stored This field is required when using any of the following auth types: kubernetes, azure, gcp-id-token, gcp-iam, or aws-iam. |
auth.config.service-account-token | Path to the Kubernetes service account token to use (optional) Default: /var/run/secrets/kubernetes.io/serviceaccount/token |
auth.config.service-account-key | Path to your GCP service account key file. This field is required when using gcp-iam auth type.Please note that the file should be in JSON format. |
auth.config.client-id | The file path where the universal-auth client id is stored. |
auth.config.client-secret | The file path where the universal-auth client secret is stored. |
auth.config.remove_client_secret_on_read | This will instruct the agent to remove the client secret from disk. |
sinks[].type | The type of sink in a list of sinks. Each item specifies a sink type. Currently, only "file" type is available. |
sinks[].config.path | The file path where the access token should be stored for each sink in the list. |
cache.persistent.type | The type of persistent caching to use. Currently only kubernetes is available, and will only work within Kubernetes environments. |
cache.persistent.path | The path to where your persistent cache will be stored. |
cache.persistent.service-account-token-path | The path to the Kubernetes service account token to use for encrypting the persistent cache. Required when using kubernetes cache type. Defaults to /var/run/secrets/kubernetes.io/serviceaccount/token |
templates[].source-path | The path to the template file that should be used to render secrets. |
templates[].template-content | The inline secret template to be used for rendering the secrets. |
templates[].destination-path | The path where the rendered secrets from the source template will be saved to. |
templates[].config.polling-interval | How frequently to check for secret changes. Default: 5m (5 minutes) (optional) |
templates[].config.execute.command | The command to execute when secret change is detected (optional) |
templates[].config.execute.timeout | How long in seconds to wait for command to execute before timing out (optional) |
Authentication
The Infisical agent supports multiple authentication methods. Below are the available authentication methods, with their respective configurations.Universal Auth
Universal Auth
The Universal Auth method is a simple and secure way to authenticate with Infisical. It requires a client ID and a client secret to authenticate with Infisical.
Create a universal auth machine identity
To create a universal auth machine identity, follow the step by step guide outlined here.
Native Kubernetes
Native Kubernetes
The Native Kubernetes method is used to authenticate with Infisical when running in a Kubernetes environment. It requires a service account token to authenticate with Infisical.
Create a Kubernetes machine identity
To create a Kubernetes machine identity, follow the step by step guide outlined here.
Native Azure
Native Azure
The Native Azure method is used to authenticate with Infisical when running in an Azure environment.
Create an Azure machine identity
To create an Azure machine identity, follow the step by step guide outlined here.
Native GCP ID Token
Native GCP ID Token
The Native GCP ID Token method is used to authenticate with Infisical when running in a GCP environment.
Create a GCP machine identity
To create a GCP machine identity, follow the step by step guide outlined here.
GCP IAM
GCP IAM
The GCP IAM method is used to authenticate with Infisical with a GCP service account key.
Create a GCP machine identity
To create a GCP machine identity, follow the step by step guide outlined here.
Native AWS IAM
Native AWS IAM
The AWS IAM method is used to authenticate with Infisical with an AWS IAM role while running in an AWS environment like EC2, Lambda, etc.
Create an AWS machine identity
To create an AWS machine identity, follow the step by step guide outlined here.
Quick start Infisical Agent
To install the Infisical agent, you must first install the Infisical CLI in the desired environment where you’d like the agent to run. This is because the Infisical agent is a sub-command of the Infisical CLI. Once you have the CLI installed, you will need to provision programmatic access for the agent via Universal Auth. To obtain a Client ID and a Client Secret, follow the step by step guide outlined here. Next, create agent config file as shown below. The example agent configuration file defines the token authentication method, one sink location, and a secret template.example-agent-config-file.yaml
= sign. You’ll notice that a custom function named listSecrets is used to fetch the secrets.
This function takes the following arguments: listSecrets "<project-id>" "<environment-slug>" "<secret-path>".
my-dot-ev-secret-template